springboot集成rabbitMQ2 上篇文章,用springboot的默认配置,完成了rabbitMQ消息的发送,但是缺点也很明显,就是需要事先在管理页面创建好对应的Exchange和Queue以及Binding关系。但是其实rabbitMQ可以在发送的时候进行检查,如不存在,则创建。这个就需要结合@Configration和@@Bean进行配置
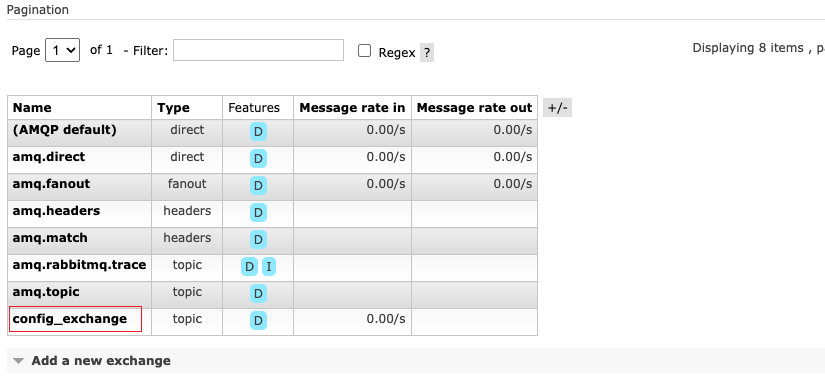
rabbitMQ自定义配置 通过config文件进行配置 依然按照之前的配置,使用topic交换机,交换机名字叫做 config_exchange,并且使用名叫 test.topic的队列,使用*.b.*进行binding。则相关代码如下:
1
2
3
4
5
6
7
8
9
10
11
12
13
14
15
16
17
18
19
20
21
22
@Configuration public class RabbitMQConfig {@Bean public Queue createQueue (Queue msgQueue = new Queue ("test.topic" , true );return msgQueue;@Bean public TopicExchange createExchange (TopicExchange topicExchange = new TopicExchange ("config_exchange" , true , false );return topicExchange;@Bean public Binding createBinding (return BindingBuilder .bind (createQueue ()).to (createExchange ()).with ("*.b.*" );
生产者代码编写 上述代码完成了对rabbitmq基本信息的声明,然后就可以向消息队列发送消息了,如果消息队列中不存在,则会创建对应的交换机、queue,并通过路由键进行绑定。
1 2 3 4 5 6 7 8 9 @TestMQ() {Exchange("config_exchange" ) ;RoutingKey("a.b.c" ) ;for (int i = 0 ; i < 10000 ; i++) {AndSend("发送消息" + i ) ;
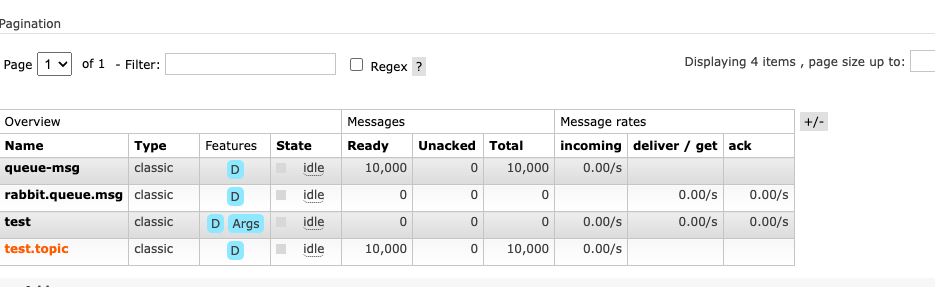
可以看到交换机,队列以及绑定关系都正确,并且消息成功送达了。
消息送达确认 虽然消息发送成功了,但是我们并不能看到相关的日志和信息表示发送的消息已经送达到rabbitMQ服务器。那么如何开启消息送达确认呢?在rabbitMQTemplate中,有setConfirmCallback(),通过这个可以指定一个回调函数,在消息送达后,执行回调函数,我们可以在回调函数中打印日志,或者做其他操作。
配置代码: 1 2 3 4 5 6 7 8 9 10 11 12 @Beannew RabbitTemplate(connectionFactory);((correlationData, ack, cause) -> { if (ack) { log.info(correlationData.getId() + "发送成功" ); } else { log.info("消息发送失败" ); } }) ; return rabbitTemplate ; }
这里我们人为创建并且返回了一个rabbitTemplate,并且指定了ConfirmCallbback回调函数。这三个参数分别是correlationData(在发送消息时随消息指定,这样,回调中就可以知道是哪条消息),ack 表示送达状态,如果是true,则表示送达成功,否则,则送达失败,同时错误原因在第三个参数 cause中。
生产者代码 1 2 3 4 5 6 @TestMQ() {for (int i = 0 ; i < 10000 ; i++) {AndSend("config_exchange" , "a.b.c" , "发送消息" + i , new CorrelationData(String.valueOf (i ) ));
这里我们简单的随着消息新建了一个CorrelationData,并且传入了当前消息的id;只所以用四个参数的发送方法,是因为只有这种方法可以指定对应的交换机,路由键以及CorrelationData。(可以点进去简单看下源码)。
1 2 3 4 5 6 7 8 9 10 11 12 13 14 15 16 17 2022 -09 -22 22 :22 :41.530 INFO 71421 --- [nectionFactory4] c.t .s .config .RabbitMQConfig : 5119 发送成功2022 -09 -22 22 :22 :41.530 INFO 71421 --- [ectionFactory18] c.t .s .config .RabbitMQConfig : 5125 发送成功2022 -09 -22 22 :22 :41.530 INFO 71421 --- [nectionFactory8] c.t .s .config .RabbitMQConfig : 5129 发送成功2022 -09 -22 22 :22 :41.530 INFO 71421 --- [ectionFactory20] c.t .s .config .RabbitMQConfig : 5117 发送成功2022 -09 -22 22 :22 :41.530 INFO 71421 --- [nectionFactory9] c.t .s .config .RabbitMQConfig : 5120 发送成功2022 -09 -22 22 :22 :41.530 INFO 71421 --- [nectionFactory1] c.t .s .config .RabbitMQConfig : 5123 发送成功2022 -09 -22 22 :22 :41.530 INFO 71421 --- [nectionFactory7] c.t .s .config .RabbitMQConfig : 5116 发送成功2022 -09 -22 22 :22 :41.534 INFO 71421 --- [nectionFactory9] c.t .s .config .RabbitMQConfig : 5135 发送成功2022 -09 -22 22 :22 :41.534 INFO 71421 --- [ectionFactory20] c.t .s .config .RabbitMQConfig : 5136 发送成功2022 -09 -22 22 :22 :41.534 INFO 71421 --- [ectionFactory18] c.t .s .config .RabbitMQConfig : 5138 发送成功2022 -09 -22 22 :22 :41.534 INFO 71421 --- [nectionFactory1] c.t .s .config .RabbitMQConfig : 5140 发送成功2022 -09 -22 22 :22 :41.534 INFO 71421 --- [nectionFactory9] c.t .s .config .RabbitMQConfig : 5132 发送成功2022 -09 -22 22 :22 :41.534 INFO 71421 --- [ectionFactory20] c.t .s .config .RabbitMQConfig : 5130 发送成功2022 -09 -22 22 :22 :41.534 INFO 71421 --- [nectionFactory8] c.t .s .config .RabbitMQConfig : 5131 发送成功2022 -09 -22 22 :22 :41.534 INFO 71421 --- [nectionFactory4] c.t .s .config .RabbitMQConfig : 5134 发送成功
总结:通过编写config文件,实现了在代码中配置交换机,队列,已经对应的绑定关系,并且实现了生产者的送达确认。其实实现方式不仅有这一种方式,还可以通过设置ConnectFactory的方式进行配置。